SPSS Modeler is a mature and widely-known tool built by IBM for Data Mining, Exploratory Data Analysis and building of Machine Learning models. Although Open Source and code-based approaches (Python, R) have become extremely popular in the last few years, SPSS Modeler is still a highly-functional and reliable tool for getting the job done – especially if you like the visual representation in streams (or respectively “flows”).
When I was new to SPSS Modeler and I was working with time series data, I found it a little tricky to select a slice of records by a defined time range, like for example: “Select all records with a timestamp from 2018-11-01 at 5:15 to 2018-12-03 at 12:30”. In this article I want to share some basic steps that will allow you to accomplish this task.
By the way: These instructions also apply to IBM’s Watson Studio products (like Watson Studio on Cloud) if you are using the “Flow Editor” feature. For this blog post SPSS Modeler 18.2 was used. It’s the newest release with which I think IBM succeeded well.
The Data Set
For demonstrating the SPSS stream we need some suitable dummy data. For this purpose I used a short Python script that leverages the pandas.date_range method to generate a dataframe filled with dummy data. This needs a few lines of code only:
SPSS Modeler would have the capability to integrate Python code into its streams, but explaining this is not the main objective of this article. So we keep it simple and generate the data beforehand outside of Modeler. If you want to download the file you can find it here.
Loading the Data Set in Modeler
We are using the “Var File” node with a semicolon as the field separator to load the CSV file:
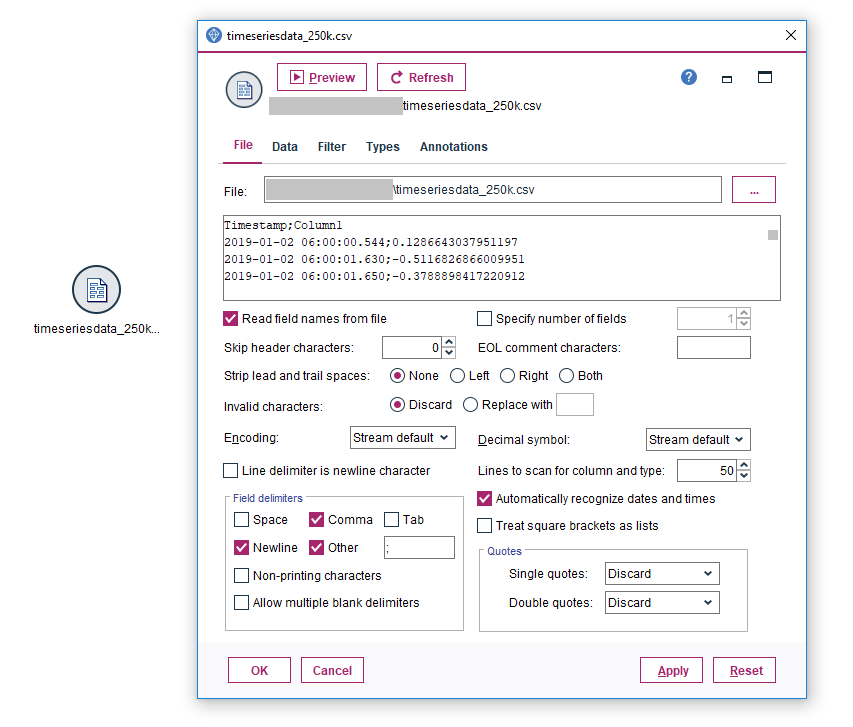
We will attach a “Type” node to the source node. Reading the values to automatically determine the storage types and variable format, we can see that Modeler is not able to understand our date format. It shows the “Typeless” level for “Measurement” for variable “Timestamp”:

But, why is that? Apart from not having a timezone indicated, don’t we have a standard timestamp format here?
Converting the storage type to Timestamp
Separating the milliseconds
The vigilant reader might have already spotted, that the values in the “Timestamp” column contain a millisecond component. Separating the fractional seconds with a dot from the rest of the timestamp makes sense, because in contrast to the other timestamp components, only the subsecond units are of decimal nature.
The only drag here is: SPSS Modeler does not support subsecond accuracy for the storage type “Timestamp” (as stated in this IBM support note). So what can we do?
The straightforward solution is to …
- … cut off the subsecond component to derive a valid timestamp field.
- … preserve the milliseconds by putting them into a separate field as a simple integer.
For this purpose we use the “Derive” node to extract the timestamp without the milliseconds, convert it to a timestamp and write it into a new field:

The SPSS CLEM formula to derive the field contains the the substring and the to_timestamp functions:
to_timestamp(substring(1,19,Timestamp))
And let’s not forget to derive an additional field that only contains the milliseconds component:
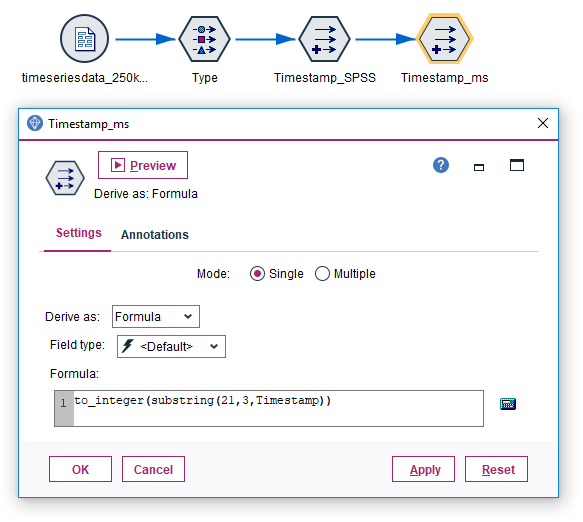
The CLEM expression looks similiar, but this time we need another part of the sequence, starting with the 20th character of the original string. Another important point: The original timestamp format of our dummy data set guarantees a fixed character length, as values are padded with zeros (Example “5” milliseconds are formatted as “005”). The to_integer function of SPSS Modeler automatically trims these zeros, giving us a clean integer that we could use for arithmetic operations.
to_integer(substring(21,3,Timestamp))
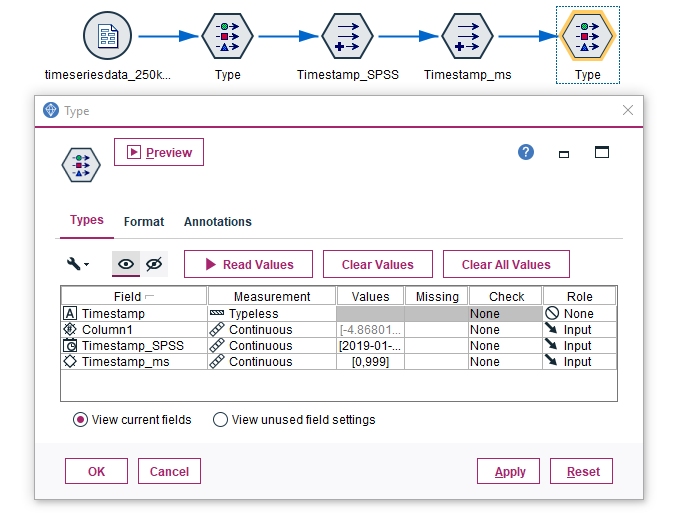
Let’s look at our final result. If we now attach another “Type” node, we can see that Modeler shows the correct Measurement Level for “Timestamp SPSS” (indicated by the icon before the label in column “Field”). Now we’re prepared to continue on our task to select a time range of records.
Quick sidenote: Example for handling DMY date formats
You might run into situations in which it is not enough to simply cut off a part of the Timestamp string, especially if specific languages were configured for CSV exports, that make the whole timestamp look differently. For European languages, you might stumble over this kind of format:
24.12.2018 18:30:22.123
We can still handle this with one “Derive” node, but we have to reassemble the timestamp string to get it into the right order.
to_timestamp(
    substring(7,4,Timestamp) >< '-' >< \
    substring(4,2,Timestamp) >< '-' >< \
    substring(1,2,Timestamp) >< ' ' >< \
    substring(12,8,Timestamp)
)
What is done in this piece of CLEM code? We are cutting out the year, month and day from the original field “Timestamp” to set them into the correct order in our new field. Also Modeler expects dashes instead of dots as separators inbetween year and month and month and day. To glue the strings together, we have to use the SPSS Modeler specific operator ><. The backslash indicates a linebreak in the code, but has no impact on the actual result value.
Input: 24.12.2018 18:30:22.123
Output: 2018-12-24 18:30:22
And that’s it.
Selecting a time range of records
But now, let’s get the job done we actually signed up for. Since we derived a properly stored timestamp, we can now make use of the built-in Date and Time functions provided by SPSS Modeler in order to select records whose timestamps match certain conditions.
This is the time range provided by our dummy data set (displayed by the “Data Audit” node when directly attached to the “Type” node):
Min: 2019-01-02 06:00:00
Max: 2019-01-03 09:46:39
We are interested in selecting only those rows (records) of the data set, which are inbetween “2019-01-02 12:30:00” and “2019-01-03 04:25:00”. For this we attach a “Select” node to our existing “Type” node and configure it as follows:
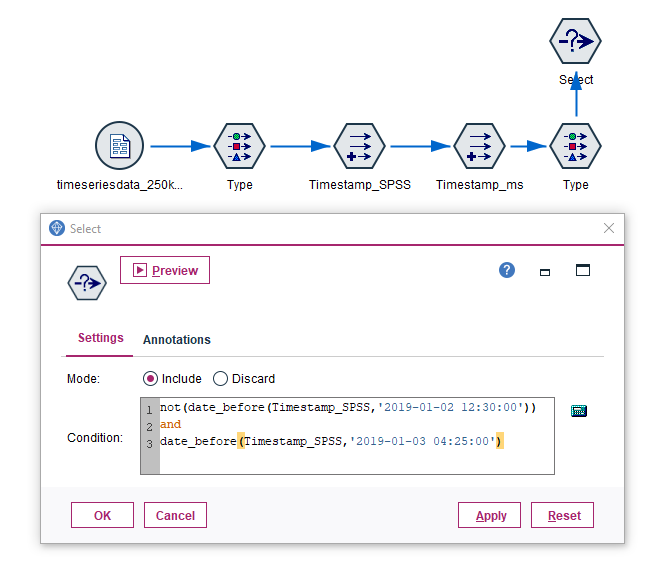
The CLEM expression in the “Select” node makes use of the date_before function:
not(date_before(Timestamp_SPSS,'2019-01-02 12:30:00'))
and
date_before(Timestamp_SPSS,'2019-01-03 04:25:00')
In spoken words: We are looking for records which are not before ‘2019-01-02 12:30:00’ and at the same time are before ‘2019-01-03 04:25:00’.
If we would want to exclude this timeframe instead of including it, we would simply choose the “Mode” option “Discard” instead of “Include” in the “Select” node.
To view the result set we could output with the table node, but we are only interested in the results of the “Data Audit” node, because it shows usthe first and last record of the result set:
Min: 2019-01-02 12:30:00
Max: 2019-01-03 04:24:59
As our dummy data set does coincidentially not have a record with a timestamp “2019-01-03 04:25:00” the last record of the selection is “2019-01-03 04:24:59”.
What about the fractional seconds?
If you have a very specific use case that demands subsecond accuracy, you can simply add an additional node in order to kick out or keep records at the edge of the result set depending on the millisecond value.
Conclusion
I hope with this summary you saved you some time for precious activities like watching raindrops rolling down the windows or having a cup of coffee instead of researching on the internet.
A place that I can absolutely recommend if you are looking for help on working with SPSS Modeler, is the IBM developerWorks Predictive Analytics forum. Some older threads (< 2015) can be found on developerWorks as well.
And now, have fun juggling with time series data in SPSS Modeler like a pro. Let me know your questions and comments.